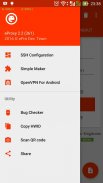


eProxy For Android

eProxy For Android ၏ ရွင္းလင္းခ်က္
eProxy For Android
- Modified outgoing request your ISP
- Send data requests through a proxy
How to use:
Option 1 (Direct Connection)
- Open eProxy, add custom request and start.
- Open your device's settings > mobile network > APN
- Edit your ISP APN and then use "127.0.0.1" as the proxy server and "1707" (default) as the port.
Option 2 (SSH)
- Open eProxy add custom request and start
- Open SSH and Check Socks5 Port forwarding and Forward All (This mode need root permission) or you can set tun2socks if your device not root
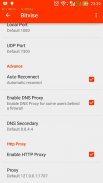
- Checklist enable HTTP Proxy and set to 127.0.0.1:(your listen port)
Option 3 (VPN)
- Open eProxy add custom request and start
- To combine with vpn add "http-proxy 127.0.0.1 (your listen port) on your vpn's configuration
Ex:
http-proxy 127.0.0.1 1707
Disclaimer :
Feature "extra protection" will be clean app was running on the background (if your device rooted), if you won't this don't activate this feature when you saving config.
*) Note:
- If you get eProxy force close when install new version, try clear clear data please (Setting-apps)
- If you get question contact our fanpage
Fanpage :
https://www.facebook.com/eProxyserver
အန်းဒရွိုက်များအတွက် eProxy
- ပြင်ဆင်ထားသောအထွက်တောင်းဆိုမှုသင်၏ ISP
- တစ်ဦး proxy မှတဆင့် data ကိုတောင်းဆိုမှုများကို Send
ဘယ်လိုသုံးစွဲဖို့:
Option ကို 1 (တိုက်ရိုက်ချိတ်ဆက်မှု)
- ပွင့်လင်း eProxy, ထုံးစံတောင်းဆိုမှုကိုထည့်ပါနှင့်စတင်ပါ။
- သင့်ရဲ့ device ရဲ့ settings ကိုဖွင့်ပါ> မိုဘိုင်းကွန်ရက်> APN ကို
- သင့် ISP က APN ကိုပြင်ရန်, ပြီးတော့ဆိပ်ကမ်းအဖြစ် proxy server ကိုနှင့် "1707" (ပုံသေ) အဖြစ် "127.0.0.1" ကိုအသုံးပြုပါ။
Option ကို 2 (SSH ကို)
- ပွင့်လင်း eProxy ထုံးစံတောင်းဆိုမှုနှင့်စတင်ထည့်ပါ
- ပွင့်လင်း SSH နှင့် socks5 ဆိပ်ကမ်း forwarding နှင့် Forward ကိုအားလုံး Check (ဒီ mode အမြစ်ခွင့်ပြုချက်လိုအပ်သည်) သို့မဟုတ်သင့်ရဲ့ device မဟုတ်အမြစ်လျှင်သင် tun2socks သတ်မှတ်နိုင်သည်
- စာရင်း) သည် HTTP Proxy ကို enable နှင့်ဆိပ်ကမ်း listen 127.0.0.1:(your~~V သတ်မှတ်ထား
Option ကို 3 (VPN)
- ပွင့်လင်း eProxy ထုံးစံတောင်းဆိုမှုနှင့်စတင်ထည့်ပါ
- VPN နှင့်အတူပေါင်းစပ်ဖို့သင့်ရဲ့ VPN ရဲ့ configuration အပေါ်မှာ "ကို http-proxy ကို 127.0.0.1 (သင့်စကားကိုနားထောငျဆိပ်ကမ်း) add
ထွ:
ကို http-proxy ကို 127.0.0.1 1707
ခွင:
သငျသညျ config ကိုချွေတာကြသောအခါသင်တို့ကိုဤအင်္ဂါရပ်ကိုသက်ဝင်ကြပါဘူးမသွားလျှင် feature "အပိုကာကွယ်မှု" စင်ကြယ်သော app ကို, (သင့် device ကိုအမြစ်တွယ်လျှင်) ထိုနောက်ခံပေါ်တွင်အပြေးခဲ့လိမ့်မည်။
*) မှတ်စု:
- ဗားရှင်းသစ်ကိုထည့်သွင်းတဲ့အခါသင် eProxy အင်အားသုံးအနီးကပ်ရခဲ့လျှင်, (ချိန်ညှိခြင်း-app များ) ရှင်းရှင်းလင်းလင်းရှင်းရှင်းလင်းလင်းဒေတာကျေးဇူးပြုပြီးကြိုးစားကြည့်ပါ
- သင်မေးခွန်းရခဲ့လျှင်ကျွန်ုပ်တို့၏ fanpage ဆက်သွယ်နိုင်ပါသည်
Fanpage:
https://www.facebook.com/eProxyserver


